Picture this: It’s one of those freezing winter mornings, and your car just won’t start. Yep, I’ve been there – standing in a cold parking lot, totally clueless and shivering. That super frustrating moment taught me something important: knowing how to use jumper cables (sometimes called booster cables) is a total game-changer. Now, I want to share what I learned so you don’t have to feel that same helplessness when faced with a dead battery.
So, let’s dive into this easy-to-follow guide! We’ll cover everything you need to know about using jumper cables the right way – safely and effectively. From the absolute basics to some handy tips, you’ll feel confident tackling a dead battery in no time.
Quick Tips to Get You Started
Here’s a quick cheat sheet before we get into the nitty-gritty:
- Knowing which cable end is positive (red) and negative (black) is key for safety. Don’t mix them up!
- Picking the right cable gauge (thickness) and length really does matter for different road vehicles.
- Make sure your Jumper Cable Clamp style matches your battery terminals.
- Safety first, always! Following the rules prevents accidents and damage.
- Hooking them up in the correct order is crucial – seriously!
- A good set of reliable jumper cables is something every driver should have in their vehicle emergency kit.
Getting Familiar with Your Jumper Cables
When your battery gives up, a set of battery booster cables can be your best friend. But first, let’s make sure you understand the tool you’re about to use. It’s pretty simple!
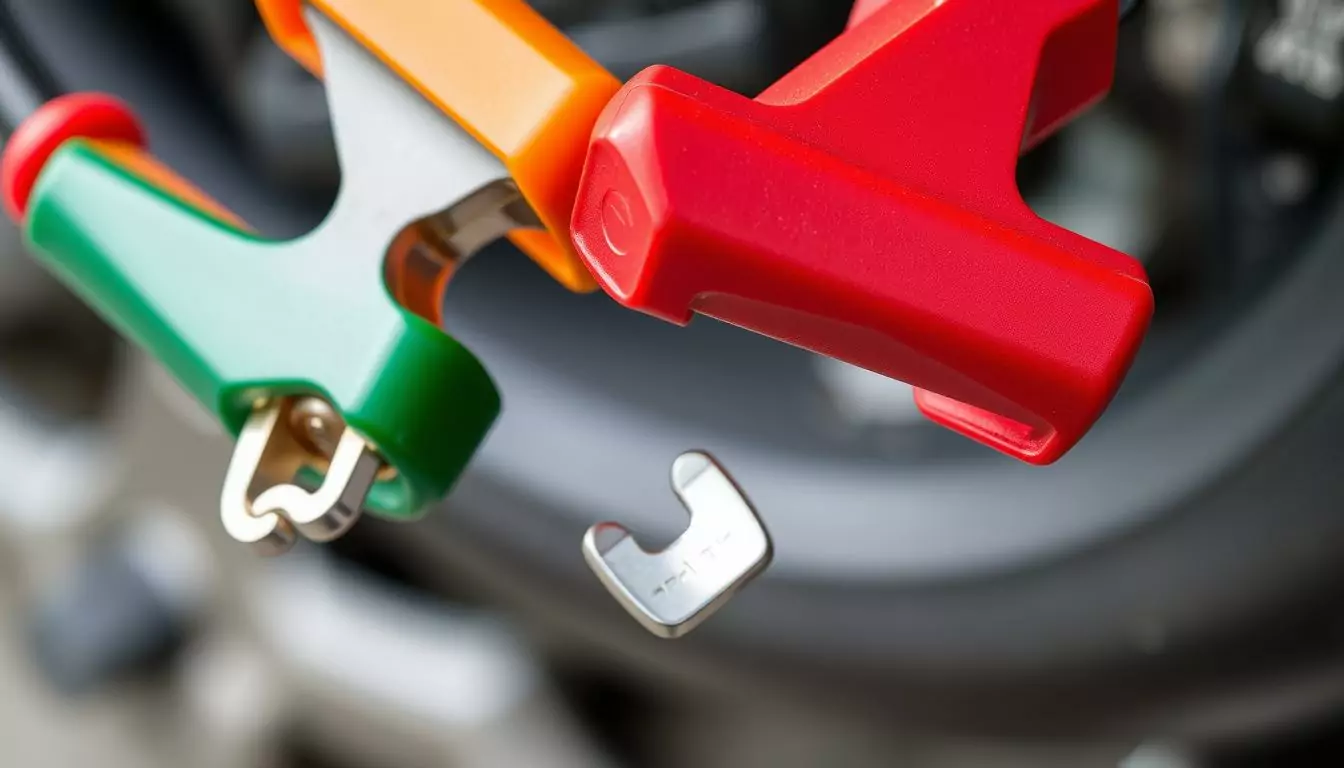
Red for Positive, Black for Negative: Don’t Mix ‘Em Up!
Jumper cables have a super simple color code: Red is for the positive terminal (+) on your battery, and Black is for the negative terminal (-) or a ground point. Getting this wrong is a big no-no – you could seriously damage your car’s electrical system or even cause dangerous sparks. Trust me on this one, just follow the colors: Red to Red (+), Black to the negative terminal on the good battery and a ground point on the dead car (-). Easy peasy and much safer!

Why Cable Thickness (Gauge) is Important
Have you noticed some jumper cables are way thicker than others? That’s the ‘gauge’ or wire gauge. Here’s the deal: a lower gauge wire number (like 4 or 6) means thicker cables. Thicker cables can carry more electrical current, which is exactly what you need to jump a dead battery, especially for larger vehicles or those with a larger engine. Most regular cars will be fine with a 6 or 8 gauge. Big trucks, SUVs, or a heavy-duty vehicle might need thicker ones, like Amp 2-Gauge Booster Jumper Cables (often referred to as HEAVY DUTY JUMPER CABLES). While REAL COPPER cable or premium copper welding cable offers the best conductivity, many quality booster cable sets use copper-coated aluminum (CCA) wire like Polar Wire to balance performance and the cost wire.
Clamps: They’re Not All the Same!
The clamps on the ends of the cables need to make good, solid contact. There are a few types of Clamp Booster Cables: ‘Parrot’ clamps have wide, curved jaws great for top-post batteries. ‘Alligator’ clamps are more versatile and usually work well on both top-post and side-post batteries. Good clamps, sometimes called Solid copper clamps if made of that material, ensure a good electrical connection. Some fancier Jumper Cable Systems even have built-in surge protectors for extra safety – pretty neat, huh? You might even find a JUMPER CABLE CLAMP ADAPTER for tricky spots.
How Long Should Your Jumper Cables Be?
Cable length matters, especially depending on your vehicle and where you might need a jump. Longer cables offer more flexibility for positioning the two cars. Here’s a general guide:
| Vehicle Type | Recommended Cable Length |
|---|---|
| Compact Cars | 10-12 feet |
| SUVs and Standard Trucks | 16-20 feet |
| Commercial or Heavy-Duty Vehicles | 25 feet+ (like 25 Foot Extreme-Duty Booster Cables) |
Longer cables give you more wiggle room, which can be super helpful if you’re in an awkward parking spot. But don’t go *too* long, as excessive length can slightly reduce the power getting through. Aim for a length that gives you enough reach without being overkill – 16 to 20 feet is often a good sweet spot from the wide selection of jumper cables available. Look for tangle-free cables if possible!
Safety First! Handling Jumper Cables Like a Pro
Okay, let’s talk safety. When you’re dealing with car batteries and electrical connection cables, being careful is non-negotiable. I’ve learned a few things to make sure everything goes smoothly and no one gets hurt.
Gear Up for Safety
Before you even touch the battery cable, it’s smart to have these nearby:
- Safety Goggles: Seriously, protect your eyes. Sparks and battery acid are nasty stuff you want to avoid.
- Insulated Gloves: Good gloves help prevent shocks and potential burns from hot surfaces or accidental sparks.
- Small Fire Extinguisher (Optional but Recommended): Better safe than sorry, right? Especially in an oily engine compartment.
- Flashlight: Especially useful if it’s dark out or the battery is hard to see.

Keep Your Cables in Good Shape
You want your high-quality cables to work when you need them! Here’s how I keep mine ready:
- Give the clamps a quick wipe after using them – prevents corrosion build-up.
- Store them coiled loosely (tangle-free rubber-coated cables are great for this) in a dry, cool place (the bag they came in is perfect).
- Check them occasionally for any cracks or damage to the Cable Insulation or clamps. Pay attention to the internal wire exposure.
- If they look damaged, replace them. Don’t try to patch them up with tape – it’s not safe! Get a new set of Standard Service Jumper / Booster Cables or better.
Dealing with Bad Weather
Weather can make jump-starting trickier. Here’s a quick guide:
| Weather Condition | What to Do |
|---|---|
| Rain | Try to keep clamps and battery terminals dry; avoid standing in puddles while connecting. |
| Snow/Ice | Clear any snow or ice off the battery terminals before clamping. Ensure a good metal contact. |
| Extreme Heat | Be extra cautious – batteries can be more volatile when very hot. Allow some cooling time if possible. |
| Windy Day | Secure loose clothing; watch out for blowing debris near the engine compartment. |
Super Important Reminder: Car batteries can release hydrogen gas, which is flammable. Absolutely no smoking or open flames nearby! Keep sparks away by following the connection steps carefully and ensuring a good ground connection away from the battery.
Your Step-by-Step Guide to Jump-Starting a Car
Alright, I’ve done this plenty of times, and if you follow these steps exactly, you’ll be fine. Let’s get that nonworking vehicle started!
First things first: Park the working car (the donor) close enough for the electric cables to reach the dead battery car, but make sure the vehicles are NOT touching each other. Put both cars in Park or Neutral and turn off the ignitions completely. Take the keys out. Pop both hoods and locate the batteries and their positive terminal and negative terminal. Sometimes the battery isn’t obvious, or there might be specific jump points under the hood – check your owner’s manual if you’re unsure.
Before connecting cables, make sure all electrical accessories in both cars are OFF – headlights, interior lights, radio, AC, wipers, everything. This prevents power surges.
Now, here’s the critical connection sequence for your booster cables – follow it precisely:
- Connect one end of the RED (+) cable to the POSITIVE (+) terminal of the DEAD battery. Ensure a firm grip.
- Connect the other end of the RED (+) cable to the POSITIVE (+) terminal of the GOOD (donor) battery.
- Connect one end of the BLACK (-) cable to the NEGATIVE (-) terminal of the GOOD battery.
- Connect the other end of the BLACK (-) cable to a solid, unpainted METAL part (a ground point) on the engine block or chassis of the DEAD car. Avoid connecting it directly to the negative terminal of the dead battery! Find a sturdy bolt or bracket away from the battery and any moving parts. This is crucial for safety.
Why that last step is so important? Connecting the final black clamp (the last of the negative cables connections) to a ground point away from the battery significantly reduces the risk of sparks occurring near the battery itself, where flammable hydrogen gas might be present. Safety first, always!
Double-check all connections. Make sure the Jumper Cable Clamp on each end has a tight grip and isn’t touching any moving engine parts (like belts or fans). Now, start the engine of the GOOD car and let it run for about 5 minutes. This gives the dead battery a little bit of vehicle charge.
Next, try to start the engine of the DEAD car. If it starts, great! You’ll know the cable connection complete its job. If it just clicks or turns over slowly, let the good car run for another 5-10 minutes (give it ample time) and try again. Don’t crank the dead car’s engine for more than a few seconds at a time during this period of time.
Once the dead car is running, let both cars run for about 10 more minutes while still connected. This gives the alternator some initial alternator time to work. Then, you can disconnect the cables. **Disconnect them in the exact REVERSE order** you connected them:
- Remove the BLACK (-) clamp from the grounded metal spot on the formerly dead car.
- Remove the BLACK (-) clamp from the GOOD battery’s negative terminal.
- Remove the RED (+) clamp from the GOOD battery’s positive terminal.
- Remove the RED (+) clamp from the formerly dead car’s positive terminal. Be careful not to let the clamps touch each other or any metal while disconnecting!
Success! Now, keep the jump-started car running for at least 30 minutes. Driving it around is the best way to let the alternator properly recharge the battery. It’s also a good idea to have the battery tested by a mechanic soon to see if it’s failing or if there’s another issue causing it to drain.
If the car still refuses to start after a couple of attempts, stop trying. There might be a bigger problem than just a discharged battery. It’s time to call for roadside assistance or a mechanic – don’t keep cranking and potentially cause more damage.
Troubleshooting Common Jump-Start Problems
Sometimes things don’t go perfectly when using battery booster cables. Here’s how I handle common hiccups:
Problem: You hear a rapid clicking sound when trying to start the dead car.
Solution: This often means the clamps aren’t making a good connection. Turn everything off, carefully disconnect the booster cables (in reverse order!), clean the battery terminals and the metal ground point, and re-clamp firmly onto bare metal.
Problem: You hear nothing at all – no click, no crank.
Solution: Double-check every single connection point (both positive and negative terminals, and the ground point), ensuring they are correct and secure. If the battery is extremely drained, you might need to let the good car run connected to it for a longer period (10-15 minutes) before attempting to start the dead car again. Check that you’re using a suitable cable gauge for the vehicle.
Remember, jump-starting is usually a temporary fix to get you going. If you find yourself needing jumps frequently, definitely get your car’s battery and charging system (alternator) checked out by a professional. It’ll save you hassle (and maybe money) in the long run!
Wrapping Up: Be Prepared and Stay Safe!
Honestly, having a reliable set of jumper cables (maybe even COMMERCIAL GRADE JUMPER CABLE quality if you drive larger vehicles or want extra peace of mind) and knowing how to use them correctly is one of those essential life skills for any driver. You might not need your Heavy-duty battery jumper cables often, but when you do, you’ll be incredibly glad you were prepared. I keep mine in the trunk right alongside my safety gloves and goggles – ready to help myself or maybe even a stranger stuck with a dead battery.
There’s a real sense of relief that comes with being self-sufficient, especially when dealing with car troubles (which always seem to happen at the worst times, right?). Stay safe out there, drive carefully, and maybe practice these steps mentally so you’re ready if you ever need them!